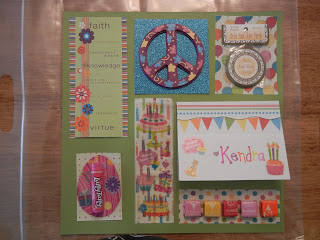
These fun pouches are what I am doing for my grands birthdays this year with a monetary gift tucked inside the card. My grands live close by so I am giving them to them in person but how fun would it be to receive such a pouch in the mail for any special occasion or for no occasion at all! They can be mailed just like they are.
They would be so cute done for Valentine's Day, a graduation, an over the hill birthday, Easter, back to school, I'm proud of you, Independence Day, Christmas, or for a sibling of a new baby brother or sister. The options are endless and ageless!
These pouches are 12" x 12" but I have also made them to be approximately 8 1/2" x 11".
Materials needed:
A source of clear plastic: I have done them using a sheet protectors, ziploc bags, and the ones shown here were made using some large plastic travel bags I found in the dollar store @ 3/$1. You can also purchase vinyl by the yard in fabric stores.

Card Stock: Choose the color and size you would like for your finished pouch. Make sure that your plastic source is at least 1" larger than your card stock.
Scrapbook Papers & Card Stock: To add color and design to your pouch.
Gifts and Prizes: Any item suitable for the special person you have in mind. The items need to be fairly flat.
Greeting Card and Envelope: You can purchase a card or make one. If you are going to mail it you will need an envelope to place the address and return address on the package.
Glue Stick or Tape: This helps to hold the pieces in place while doing your stitching.
Sewing Machine and Thread: To stitch up the pouch silly!
To make: Layout your page like you would a scrapbook page. leave at least 1/4' on all sides to allow for the stitching. If you plan to mail the pouch don't forget to address it. Once you are happy with your layout you can use glue or bits of tape to hold the papers and objects in place.
Once everything is secure slide the project into the plastic of choice. If using vinyl by the yard sew up two of the sides before this step. Slide the card stock in so that two of the sides are flush with two of the unopened sides of the plastic. If using a sheet protector your card stock will need to be 1/2" smaller than the protector on all sides.
It's time to stitch it up! I use a medium-large size zigzag stitch. Stitch along the bottom edge and one side first. Work your way up and around by stitching around each of the segments of your design.
Trim off any excess vinyl.
Awe, Isn't it cute?
Say hello to the postmaster for me!


so cute!
ReplyDelete